

Fri, 11. December 2020
Polar Aligning A Telescope For Astro-imaging

It's a non-negotiable necessity. Without good polar alignment, you can't track the stars, you can't take long exposures and auto-guiding can become erratic.
Using a polar-scope to align is a real struggle. Kneeling on the ground, in the darkness, neck tilted backwards trying to recognise inverted star formations which are probably not even in the field of view was not my idea of fun. I know a lot of astronomers in the Northern Hemisphere still successfully do this - but they have magnitude 2 Polaris just 44 arc-minutes from the North Celestial Pole (NCP).
Not so here in the Southern Hemisphere. Our "Pole Star" is magnitude 5.4 Sigma Octantis (σ) It's inconspicuous - and it is a whopping 68 arc-minutes away from the South Celestial Pole (SCP).

σ Octans: Image attribution: IAU and Sky & Telescope magazine (Roger Sinnott & Rick Fienberg), via Wikimedia Commons
The drift align method made some some sense to me. It consisted of centering a star in the camera monitor and watching how far it drifted in RA, adjusting the bolts and repeating again and again until there is no drift. You can observe the drift in an image (pictured) by slewing the scope slowly in one direction for thirty seconds and then back again. The concept is to close the "V"until the star returns to the exact same spot and the outward and return lines are indistinguishable.
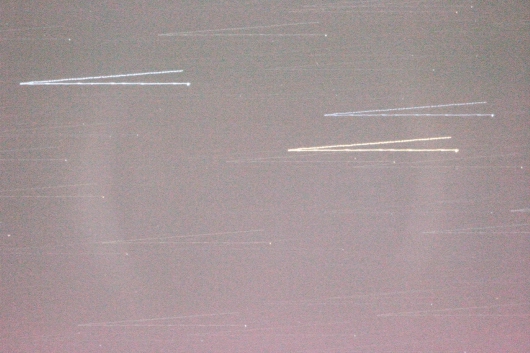
Image copyright: Roger Powell
The whole process is then repeated on a different star and noticing how far it drifts in DEC. The more accurate you want to be, the more time it takes. I could have spent three quarters of the evening doing that - and it did not actually measure the accuracy!
When I bought my refractor telescope and Skywatcher EQ6 mount, I realised that I really needed to to further improve my polar aligning technique. Drift aligning did not provide me with the degree of accuracy the guiding system required for smooth and accurate guiding.
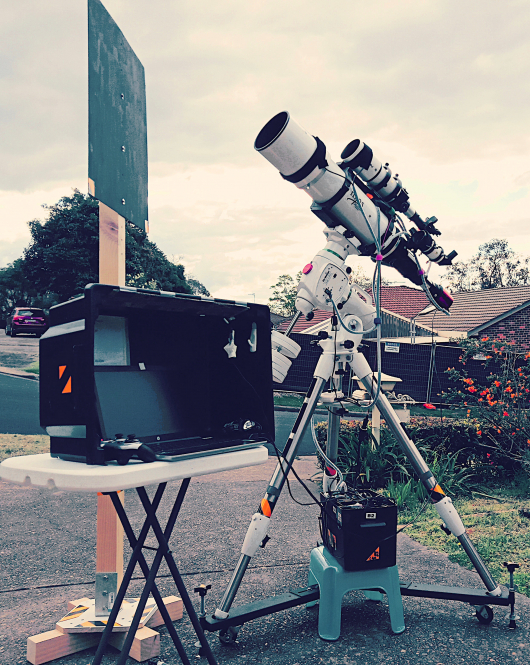
Image copyright: Roger Powell
Next I discovered PoleMaster, which is claimed to be accurate down to 30 arc-seconds. It consists of a small camera fitted on the polar axis of the mount, in front of the polar scope with a software routine which aligns the axis of the mount with the axis of the Earth.
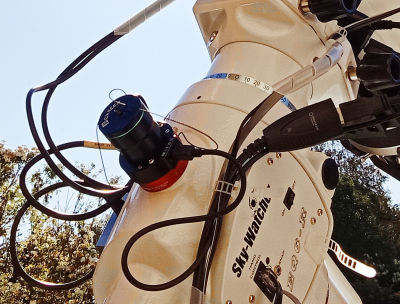
PoleMaster Camera: image copyright: Roger Powell
It certainly revolutionised my technique but it did not measure the accuracy. I started checking the measurement in SharpCap (the software I use for capturing images). Most of the results varied between one and four arc-minutes, although I did record a couple of measurements of 20 arc-seconds.
With much room for improvement, I started using the SharpCap routine to polar align. It is even simpler than the PoleMaster method - but much more precise - and after a few attempts I quickly nailed it.
I continue to use the wide-angle PoleMaster camera (but without it's software), to quickly identify and centre the polar region using the Alt-Az bolts before beginning the SharpCap routine in my imaging camera.
I now consistently achieve a polar alignment accuracy between 0 and 10 arc-seconds and guiding is always below half a pixel.
POLAR ALIGNMENT PROCEDURE SUMMARY
1. Rough align the tripod in daylight.
Set up the tripod facing True South with the help of a magnetic compass, offsetting for magnetic deviation at the location, which here in SW Sydney is 12.5° East of Magnetic South.
This procedure needs to produce a polar alignment accuracy of less than about 4°.
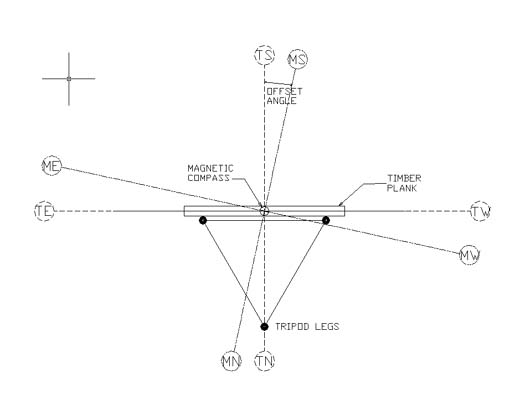
Image copyright: Roger Powell
2. Level the tripod and place the mount in position.
Still in daylight, level the tripod as accurately as possible by adjusting the tripod legs and using a spirit level in the North-South and East-West directions.
Make sure the mount is lightly lubricated before placing it in position and securing it tightly.
Adjust the Azimuth bolts so that the mount is centrally aligned and set the Altitude pointer to your approximate latitude.
4. Improve the mount calibration with PoleMaster
After dark,with the telescope fully set up and ready to use, wait for the first stars to appear.
Open SharpCap and select the PoleMaster camera. If the previous stages have been completed with reasonable accuracy, the camera should always show the polar region in its wide field of view (11° x 8°). If it does not then, assuming the latitude is correctly set, adjust the Azimuth bolts until found.
Locate Sigma Octans and estimate the approximate location of the South Celestial Pole. Centring the SCP using the Alt-Az bolts should improve the polar alignment to less than 0.5°.
5. Accurately calibrate the mount alignment in SharpCap.
In SharpCap, switch to the main imaging camera and follow the on-screen instructions to get a perfect alignment.

Here is a good SharpCap polar aligning video. It's for the Northern Hemisphere but that's of no consequence.
Comments
Display comments as
(Linear | Threaded)
The author does not allow comments to this entry

