

Sun, 27. August 2017
Imaging the Planets

Despite some great views through the eyepiece of Jupiter and Saturn, my astro-images of planets never really impressed.
A better way of imaging is using video and stacking the frames to produce a sharper image with better contrast.
There may be other ways of achieving a good planetary image but this is how I take the initial image:
1. Using my Canon 60D attached to my telescope, set camera to video mode.
2. Select 640x480 digital zoom (crop).
3. Centre the planet.
4. Take at least two minutes of video at 50 frames per second.
Afterwards, download the resulting MOV file to the computer. The stacking will be done in Registax but the video needs to be converted to an AVI file first. Even this is not enough and I find that I have to convert it twice. It also requires the right codec to be installed (in my case I use x264vfw_full_42_2538bm_41390 - which can be searched on the interweb).
So the processing method is:
1. Open Freemake Video Converter.
2. Import the MOV file into Freemake and convert it to AVI format.
3. Save the file, identifying it as a Freemake file (e.g. Saturn-fm.avi) then close Freemake.
4. The Freemake AVI file is not openable in Registax.
5. Open VirtualDub.
6. Import the Freemake AVI file into VirtualDub and clip the frames at the start and end to suit.
7. Hit 'save as AVI' - identifying it as a VirtualDub file (e.g. Saturn-fm-vd.avi).
8. The VirtualDub AVI file is openable in Registax.
9. Open Registax 5 and hit 'select'.
10. Process the VirtualDub AVI file (e.g. Saturn-fm-vd.avi) in Registax.
11. Save as a jpg file.
12. Process the file in GIMP (or Photoshop or whatever other image enhancing software you choose).
13. Publish!
Saturn image © copyright Roger Powell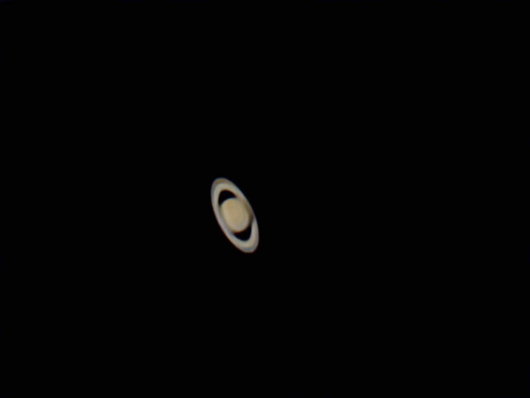
So, in summary, I use four different software stages to achieve a sharp image:
Freemake > VirtualDub > Registax > GIMP

